Brushless Motor for £6
Got your attention now? Good, then I'll begin...
As you may know, I recently bought an Ikarus Piccolo electric helicopter, which I'm now attempting to learn to fly. And a tricky little blighter it is as well!
Anyway, I've been browsing some forums on the internet looking for info on how to improve the Piccolo. From this, I found that some people are rewinding computer cd-rom drives into brushless motors and fitting them into r/c helicopters, park fliers etc. Hmm, interesting...
Rather than stripping my own cd-rom drive, I found that there's a company in America called GoBrushless (www.gobrushless.com) that sell brushless motor "kits" of various sizes. Their cd-rom motor kit is a pretty much direct replacement for my standard Piccolo motor (280 size). The best bit is the GoBrushless kit is only $11, which is about Ł5.80! ....Cheap or what!
Hurriedly I dusted off my credit card and promptly ordered 2 kits (plus a few other bits). Postage was only $6 (about Ł3). Payment was via PayPal by the way (www.paypal.com/uk/), this is a nice secure way of ordering stuff over the internet.
Four days later a package dropped through my letterbox! Pretty impressive service I thought. After excitedly tearing open the package (just like a big kid at Xmas) here's what I got.
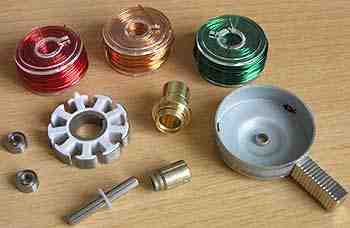
This is a photo of a single kit. The coloured reels at the top are the 3 reels of wire for winding the motor. And from left to right, there's also 2 ball races, the armature, main shaft, brass bearing & armature support (and bush if you don't want to use the ball races), the motor can and a stack of minute (5 x 5x 1 mm) Neodym magnets stuck to the can. The kit comes with full instructions (also available on various websites) so I won't go into the full details of how to build a motor, 'cos this will end up a very long article.
Step 1 is to wind the armature. I chose to use 14 turns on each pole of the armature, which should give a medium power motor. You have to wind one pole, skip 2 poles, wind the next etc. See photo below.
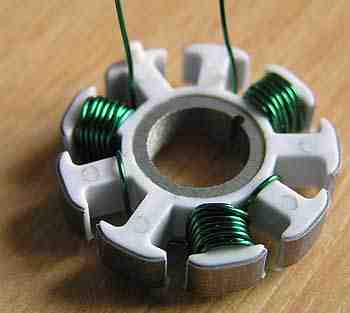
Step 2 is to wind the other 2 "phases" ....remember we're building a 3 phase brushless motor (sort of). This also where the different colour wires come into play.

This completes the armature (apart from connecting the wires together).
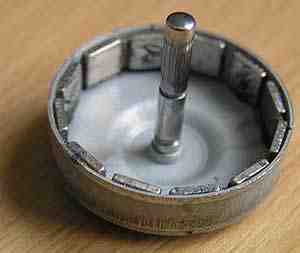
Step 3 is the sticking the magnets into the can. A bit fiddly, but not that bad a job. The magnets are stuck in with superglue.
Step 4 is to press the shaft into the can. I just used a bench vice, but you need to take your time to get a motor that doesn't wobble around. See photo below to see the can with magnets and shaft installed.
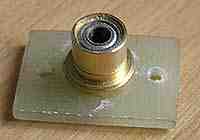
Step 5 is to superglue the bearings into the brass shaft support and make some sort of motor mount (you can buy fancy ali one's but I made mine out of a bit of fibreglass board).
Last step is to superglue the armature to the brass bearing support. Don't forget this is an "outrunner" motor, so the armature is fixed and the can/magnets rotate. In my rush to get the motor running I forgot to take a picture of the completed motor, sorry. However here's a photo of the motor installed in the Piccolo. Note the size of the motor compared with the SuperTec pico servos.

Last job is to connect the speed controller. As this is a brushless motor, you have to use a brushless speed
controller (obvious really). From surfing the internet forums, the Castle Creations Phoenix 10 seems a popular
choice, so that's what I went for. Apart from the fact that it's tiny (about 20 p coin size), the beauty of this
controller (pictured below) is that it's programmable. You can set cutoff voltage, current limiting, brake
(soft, hard, none), throttle type (plane or heli), motor timing, soft/hard cutoff and soft/hard start.
And there are 4 or 5 settings for each!
Enough for every possible use! (it's a 10A controller by the way)

So does the motor work? Yup, first time .....MUCH to my surprise! Trying it in the Piccolo, it's easily got the same power as the standard 280 motor (if not more) and it's half the weight, twice as efficient, etc, etc. All this for Ł6 and about 3 hours work...
Here's a few useful links if you want to find out more.
Now all I need is a set of LiPo cells and some more practice learning to fly the Piccolo. I've taken to flying it in the garden on still evenings, after an argument between the rotor blade and doorpost in the living room! No need to say who won that one :)!